

What’s Old Is New Again: Restoring Historic Beams at UMass Lowell
The campus of UMass Lowell was furiously busy during the summer of 2018 as architects, builders, designers and preservationists work diligently to complete the renovation and restoration of Pasteur Hall. The one-story building was constructed in 1910 as part of the Lowell Textile Institute, a collaboration between the Commonwealth and the private sector dedicated to textile education such as textile dyeing and textile engineering in support of a major industry in the region. In the 1930s three additional stories were added to the building which became part of the University of Lowell – now UMass Lowell. It was designated as the home for the Chemistry Department and it was formally named Pasteur Hall, for renowned chemist Louis Pasteur, in 1937.
Eighty years on, this well-used building has been rechristened as Dandeneau Hall after UMass Lowell alumnus and benefactor James Dandeneau. Mr. Dandeneau’s philanthropy to the university has funded the renovation and preservation of the building. Going forward the building will be home to the computer science and mechanical engineering departments along with classrooms, robotics and computer science laboratories and lounge space for students and faculty.
The plan for repurposing the space included opening it up all the way to its original wooden beams, revealing its history as part of the Lowell Textile Institute. Modern spaces have been created with glass walls and partitions to maximize natural light.
M&A was called on by Commodore Builders to look at the project because we are experienced in historical building renovations, including structural stabilization. In this case, four floors of the building had severely cracked beams which needed to be repaired in order to support the spaces being renovated. The initial plan was to employ high-pressure epoxy injections into the cracks to stabilize the beams. The project was anticipated to last about two weeks.
On further review between M&A and the construction and design team it was determined that the original epoxy injection planned was not the optimal solution for all the beam conditions which were exposed. There were cracks in many of the beams that ran the full length of the beam and through the bolt holes. Some of the beams were warped. There were concerns that epoxy injection would be difficult to dam so that it could fill the space correctly. There were also areas that had access issues due to the heating, electrical and water pipes that obstruct access to areas of the beams. The decision was made to find an alternative solution.
The preservationists at M&A are well-versed in the hidden challenges and surprises that historic restoration can provide. M&A along with the design and construction team began researching alternative methods that could be used instead of the epoxy injections. We reached out to our colleagues at Fire Tower who specialize in the engineering and design of timber structures. Fire Tower introduced the team to a technique using long screws to reinforce the beams.
The process is an engineered system of strategically placed long stainless-steel screws which would be installed in specially designed grid patterns in order to correct the beams to prevent further warping, twisting and cracking. The length of the screws and the 45-degree angle for installing them would stabilize the beams so that they would last for another century.
Once the screw installation was agreed upon as the preferred method for the project, finding the screws became the next challenge. The screws required are manufactured in and imported from Germany. The quantity – more than 1600 – was greater than most suppliers could provide. Fortunately, after some diligent searching, a supplier in Vancouver, Canada was located. The supplier was able to provide enough of these long screws to complete the project. They were the only supplier in North America who were able to supply the quantity and size of the screws required. If they had needed to custom order them from Germany, the entire project would have been thrown off its timeline.
Once the screws were located and ordered we set about determining the best method to install the screws. This was a whole new challenge for M&A. Screwing into a wood beam is a task, but to place 3/8” self-tapping stainless-steel screws ranging in length from 20-27 inches long into the beam, at exactly a 45-degree angle, in specific patterns with specific distances apart, some screws being as close as 2”, called for some clever techniques. There was little or no margin for error.
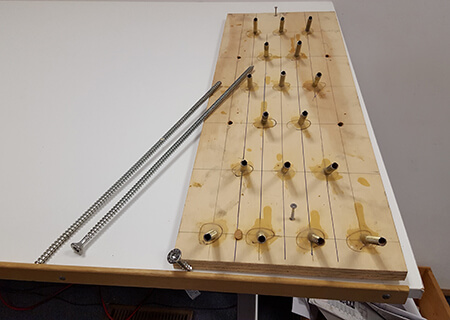
We designed a jig – essentially a pattern – for each of the unique combinations of screw patterns which were required. The jig consisted of a wood board in which we placed metal guides at the correct distance and configuration which would ensure an accurate 45-degree penetration of the beam by the drill. (see illustration)
Long drill bits were used to pre-drill pilot holes through the jigs in the required pattern prior to setting the screws. This system gave us the accuracy we needed. Still, some of the screws did not make it: the beam simply refused them, and they had to be removed and re-drilled. It was arduous work, but preservation isn’t always the finest and most delicate joinery.
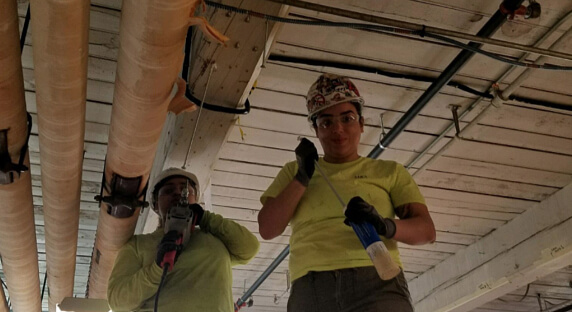
Our work began on the top floor with heavy duty equipment and full power tools. These tools are quite heavy and the average installation time for each screw was a half hour which was taxing on the crew who were working 12 feet off the ground. The drills would also often overheat so we needed multiple drills for each area we were working on. As we worked, people doing other renovation in the building came to see what we were doing. There was great fascination with the idea of reinforcing the beams with screws – and some concern over putting so many screws into the beams. We reassured concerned onlookers that the 45- degree angle at which they were inserted provided stability to the beams.
We were able to finish the job installing about 1600 screws into 32 beams in about 10 weeks. Although the technique is unusual, the project engineer is now recommending it on other projects based on our success at Dandeneau Hall. From an engineering perspective, the screws were a superior solution for these particular beam conditions. Now that we have mastered this new technique, should we find ourselves on a project where this would be a suitable solution, we would not hesitate to use this method again.